
Part 1 (separate page)
|
Part 2 (this page)
|
Part 3 (separate page)
|
(initial section posted 9/29/06)
Because of hurricane Wilma, I had to adjust my plans to some extent. After returning from Morocco, I had to focus on cleaning up from that hurricane and preparing for the next season.
There was some damage to the roof, but there were no apparent leaks.
Fortunately, most of the damage was external to the house.
There was significant damage to the fence,
and the patio enclosure was totalled.
Here's a picture showing some of the aftermath of Wilma:
(Side note: notice how grungy the deck is.)
We were able to pull the edge of the enclosure out of the pool and prop it up, and enough of it was still hanging together that it stayed up, even though it was bent and largely disconnected from the house and the deck.
So my first order of business, after getting through the holidays and getting the insurance settlement, was to remove a large Norfolk Island Pine tree from the back yard. I felt kinda bad because I had planted it as a tiny little thing many years ago, but these kind of trees are brittle and can break easily in a big wind. Even if the trunk doesn't break, the limbs will, and they have trouble growing back... so this tree was looking more like a large toothbrush than a tree. I wanted to get it removed first because it had gotten very tall, and in case something got damaged during its removal, I wanted it to happen before I got started fixing things. (Nothing did...)
Next I started trying to get the roof fixed. That was a challenge; roofing contractors were all loaded with work and most of them weren't even taking new calls. Finally, after a few weeks, I did manage to get one that could get the work done within a month or so. (It turned out there was one spot where there was more damage that was apparent, and needed extra work, so it took longer to complete than expected.)
Somewhere along the way I also managed to do some patching to the fence, putting back the sections that had blown down. There are still a couple of posts that had gotten damaged, so the fence isn't quite right still, but at least it's functional.
By this time, hurricane season was upon us again. I had been wondering what to do about the screen enclosure. Although I liked the idea of having a screen room for sitting and to let the cats out, I was concerned about rebuilding it the way it was because of the likelihood of it getting damaged again in the next storm. Whatever I did, I at least had to get rid of what was there before we got another storm. I figured whatever I decided about the rebuilding, I'd wait until hurricane season was past to do it.
I happened to see an ad for someone who would remove these screen enclosures for free (he then makes money by selling the scrap aluminum), so I had him come by. Then, he mentioned he knew someone who built screen enclosures, and I talked to that guy, and he wanted to come over the next day to give me an estimate. So I figured I might as well go with the flow and agreed. I had decided by then to just screen in the roofed part of the patio and leave the pool area uncovered.
But, before we put up a new screen enclosure, the deck itself needed to be resurfaced somehow. The original surface was chattahoochee, which is difficult to care for (remember how grungy it was right after Wilma--it was only worse now) and also unpleasant to walk on. We'd wanted to do something with the deck for a while but it just hadn't happened. When I told the screen guy about needing to do the deck, he told me he knew a guy who did deck surfacing. So the next thing I know I'm getting called by the deck guy, wanting to give me an estimate on that. I'd been thinking about getting pavers, but he suggested this stuff called Cool Deck which would cost about half as much. The pictures looked good, so I agreed to do it, but I had to wait until after the roof got cleaned. (The homeowners were getting on my case about it--I'd been intending to do it last year, but then the hurricane hit, and then I had to wait for the roof repairs to be done.)
No, he didn't know a roof-cleaning guy, but I got one, and got that
done, and then the deck and the screen were done very quickly
after that. Even though it was the middle of hurricane season,
I figured since I had the guys lined up, there was
no point in my waiting until the season was over.
So by the end of August I had a new pool deck and screen enclosure.
Here's an "after" picture showing the deck and the lack
of screen enclosure around the pool,
along with the fence repairs:

And here's one showing the new screen enclosure:

 And hey, with a whole new patio, I had to get new patio
furniture, right?
Actually the old stuff was over 20 years old and
starting to fall apart anyway.
I saw this set on
HomeDepot.com and liked it... and
it was even on sale... so I figured it was
meant to be.
(Note: in the background of the picture you
can see some of the not-quite-right-yet fence.)
And hey, with a whole new patio, I had to get new patio
furniture, right?
Actually the old stuff was over 20 years old and
starting to fall apart anyway.
I saw this set on
HomeDepot.com and liked it... and
it was even on sale... so I figured it was
meant to be.
(Note: in the background of the picture you
can see some of the not-quite-right-yet fence.)
I still have some outdoor stuff to do,
but next I want to focus on
some indoor stuff, especially the painting.
Painting: Phase 2 - Guest room
As I mentioned in my writeup on painting phase 1, my initial attempt at faux resulted in one very dark wall, which I chose not to re-do at that time, which at least allowed me to put the furniture back and get the room functional. However, it had been bothering me because it just didn't look good, so it was the first priority when I was able to get some time for painting again.
| On the first weekend, I was able to get the one wall repainted with the undercoat (2 coats to cover the old dark stuff). (That's the wall on the left; the right wall is the "good" (lighter) faux.) |

|
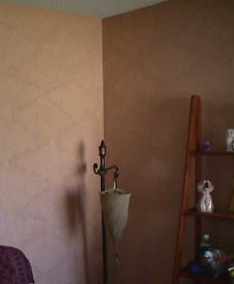
| The next weekend I did the faux work to match the lighter faux I had done before. Here's how it started. |

|
| And here's how it looked when done, in early September (same corner as the first picture). Hooray! The walls match now! |
|
(next section posted 10/20/06)
Painting: Phase 2 - Hall
So, the next project was the hall. It had been needing work anyway, but I made it worse last year when I patched some nailholes (thinking I'd be able to get to it sooner). With one last relatively free weekend in September, I wanted to get rid of that irritant.
| All the prep was the hard part, because there's a lot of doors and edges in the hall. Here's an intermediate pic, after I did the trim but before I did the walls themselves. |

|

| And here's how it looks now. I'm still in the process of doing the closet doors, so I'm not quite done yet, but look how fresh and clean it looks! |
(next section posted 11/1/07)
Painting: Phase 2 - Laundry
It's been a while since I posted an update here, but it's not from total lack of work. My next project was the laundry. It's really too bad I forgot to get "before" pictures, because it was in pretty bad shape, which is why it had bubbled up in the priority list even though it's not a highly visible area.
A few years ago, the water input to the room started leaking, and ended up causing some damage before we got it under control and then fixed. It damaged a section of the drywall, such that it was warped and peeling. It had also soaked some of the wood baseboards, causing them to rot out. We tried replacing them with new plastic baseboards, but we didn't have the right saw to cut the corners properly, so they were never quite right. Plus, there were black marks on the walls from the washing machine hoses, and general ickyness from never having been painted before.
So, I found a friend that had a saw that would cut the corners of the baseboards, and one weekend over my holiday break last winter we put in the new baseboards--plastic ones this time.
 Then, it took me another weekend to finish it up,
cleaning and painting.
I also put up a shelf-hook-gizmo for hanging the mop, broom,
and other cleaning stuff so they wouldn't be just piled on the floor
like they had been.
Right is a bit of an "after" picture.
I couldn't get too much at once because I didn't take it until
after I'd put the washer and dryer back.
And the pic turned out rather darker than the real thing--it's
actually more of an almond, the same as the rest of the house.
But you can see the nice new baseboard, the nice even paint,
and the mop not on the floor.
Then, it took me another weekend to finish it up,
cleaning and painting.
I also put up a shelf-hook-gizmo for hanging the mop, broom,
and other cleaning stuff so they wouldn't be just piled on the floor
like they had been.
Right is a bit of an "after" picture.
I couldn't get too much at once because I didn't take it until
after I'd put the washer and dryer back.
And the pic turned out rather darker than the real thing--it's
actually more of an almond, the same as the rest of the house.
But you can see the nice new baseboard, the nice even paint,
and the mop not on the floor.
Painting: Phase 2 - Office
If you recall, the wallpaper in the office was the first domino that was set up, and I still needed to finish that off. So I planned to do that over the summer. It was quite a process just to prepare, because the room has lots of shelves and stuff in it and most of it needed to be moved (again).
Again, because I was painting over wallpaper, I planned to do a "faux" technique. I decided to do basically the same thing I'd done in the guest room, but reverse the colors, so here I'd put the darker color on the bottom and the lighter color on top.
| So here we are, getting close to finishing the undercoat, with the darker paint. You can kinda see how icky the wallpaper looks. |

|

| This is almost the same view, as we're starting the lighter overcoat. |
| Pretty much the same thing, but at a different angle and closer. |

|

| The finished wall, as I'm starting to put stuff back. |
Well, it took pretty much all summer, what with the prep moving stuff, the actual painting, the touching up, and the putting stuff back (including cleaning it and organizing some stuff I hadn't bothered to do after the tiling because I knew I was just going to have to re-do it when I painted anyway), but I think that finished Phase 2. I think I'll call any future painting "Phase 3." Now I need to prioritize my other projects... It never seems to end....
(next section posted 6/25/08)
New Carpets
Of course, having tile throughout the house can make it hard on the feet, so it's good to place some rugs around. The nice thing when it's not wall-to-wall is that it's easy to change around if you want. So, along the way, I've acquired a few carpets to soften up the tile floors; following are a couple that I particularly like:
| This is in the living room, a contemporary design in shades of brown. |

|

| And this is in the former formal dining room (now basically a sitting area). This Oriental-style carpet has images of camels on it. Oh, and the blackish blob in the middle of the chaise at the back of the room is not a pillow--it's my cat Mimi. |
Continue to Part 3
Return to Part 1
 Return home