Doing some closet cleanout, I came across several polo shirts, which I mostly used for "business casual" back in the says when I worked an office. I almost never wear them any more. But there were a couple that I had enough attachment to that I would prefer to upcycle them into something I would wear, rather than donate them.
I did a lot of poking around Youtube and other online sources looking for inspiration, but didn't find anything that caught my fancy. Then it popped into my head that maybe I could turn one into a pair of shorts? The crotch area would be where the sleeves were, which would mean the shirt front would be one leg and the shirt back the other, the pocket/logo could be placed on the front hip, and the button placket might work as a closure. It might just work. I thought the idea was interesting enough to be worth a try.
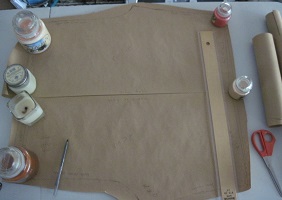
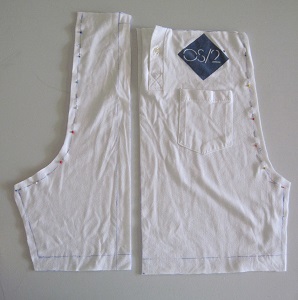
I was gonna need some kind of pattern to cut the crotch shapes, so I decided to make one by copying a pair of my own pants that fit pretty well, were comfy, and had no side seams (what I was expecting for this particular project, but which also should be useful for some other pants projects I have in the back of my brain). (First pic below shows the pants laid out on the pattern paper.) I ended up with 2 pattern pieces, one for the front and one for the back (to be joined for the side seam). (2nd pic below shows 2 pattern pieces laid out together on the table to confirm alignments before fully cutting them out.)
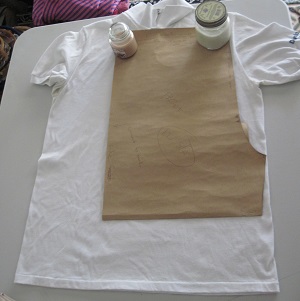
Then of course I had to make a mockup, just to be check what I'd done.
When I laid the pattern pieces out on the mockup fabric
(basically like the 2nd pic above), I noticed that it looked
oddly wide, wider than the shirt I was planning to upcycle.
Thinking about it, I realized this should have been expected:
the shirt is big enough to go around my hips, but for pants you need enough
to go fully around both legs.
The shirt fabric does have some stretch, but would it be enough?
The only way to be sure would be to go ahead with making the shorts.
And if it turned out there wasn't, it shouldn't be too hard to
add the necessary width (a useful feature of the no-side-seams).
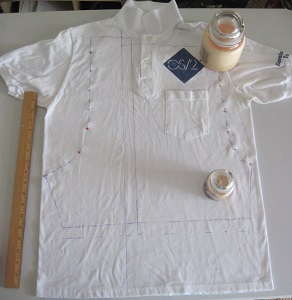
When I laid out the front pattern piece on the actual polo shirt I planned to use (see Footnote), it was very obvious that stretch wasn't going to be sufficient (pic at right), and I resigned myself to doing some piecing. I figured I'd need about 6" on each side. I considered using the bottom part of the shirt (below where the hemline of the shorts would be cut)-- there just MIGHT be enough fabric-- but decided against it because it wouldn't stretch the right way. I was sure I could find something that would work from my pile of T-shirt scraps. Then I remembered having had a tee with the same theme as the polo (as described under Footnote), which I thought would be perfect, although I hadn't seen it in a while so I wasn't sure where it was, or if I even still had it. It wasn't with the tees/scraps for upcycling. Turned out it was among my "wearable" tees; I just never wore it. So, bonus! Another thing that wasn't being worn would get put to use.
But back to the main pattern pieces. I had to allocate how to divide the polo shirt between the front and back pattern pieces. I considered doing it half-and-half, which would make it easy for me to omit the button placket, which would make sewing the top edge easier. On the other hand, part of the point of this project was to use a polo shirt, and if I didn't use the placket I could just as well have started with a T-shirt. Plus, I had some interest in how the placket might be used for closure-- hard to do if it's not there. So I ended up dividing the shirt with the placket on the front piece and about an inch beyond that to allow for seam allowance for easy sewing. (I originally tried about 2 extra inches, but then the back piece seemed too weirdly narrow at the top.)
The original pants had an elasticized waist where it looked like the top of the pants had just been folded over to make the casing, and that's how I'd made the pattern. But I was concerned that it would be hard to fold like that with the placket there, so I decided to make the shorts with a separate waistband (made from the bottom part of the shirt) and adjusted the pattern accordingly. Then I placed the front pattern piece as high up as I could on the shirt, while avoiding the collar and the top button on the placket, and remembering to leave space for seam allowance (those crotch points are the tricky part :-)). Did basically the same for the back piece, and cut them out. Pics below:
 Next was the extra pieces from the T-shirt. They would basically be
rectangles, but I needed to know how wide. Comparing the full width
of the pattern to the full width of the pieces cut from the polo,
the difference was 8.5". I rounded that to 9" to allow for
seam allowance (I figured there'd be a little in the stretch too).
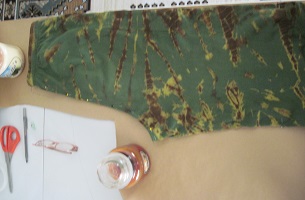
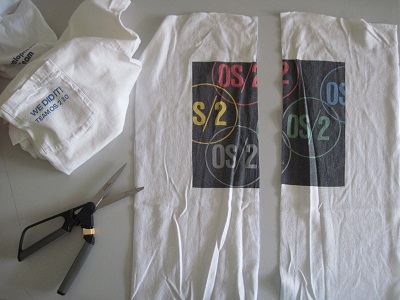
The tee had a fairly large graphic on the back, so I just cut it down
the middle and 9" out on each side (pic at right). I'd adjust the length later, when
I could better tell where the graphic would be positioned.
Next was the extra pieces from the T-shirt. They would basically be
rectangles, but I needed to know how wide. Comparing the full width
of the pattern to the full width of the pieces cut from the polo,
the difference was 8.5". I rounded that to 9" to allow for
seam allowance (I figured there'd be a little in the stretch too).
The tee had a fairly large graphic on the back, so I just cut it down
the middle and 9" out on each side (pic at right). I'd adjust the length later, when
I could better tell where the graphic would be positioned.
I also cut a 3" strip from the bottom of the polo to use for the waistband.
Again, I didn't bother to measure, was just gonna figure it out as I went along.
Sewing was fairly straightforward. First I stitched the 2 crotch seams. But since I hadn't done the math for the side seams, and the back waistline of pants is normally higher than the front waistline, that meant the side tee-shirt pieces wouldn't be perfect rectangles, so I had to think a bit. First I positioned the side-back graphic where I wanted it to go on the back piece, and stitched. Then I cut the bottom edge of the side piece to match the back piece. Then I used that bottom edge to align the front piece, and stiched them together. Then I could cut the top edge of each side piece.
Then it was just waistband and hems. The hems were straightforward; the waistband less so, mainly because of the button placket. Since I was planning an elastic waistband anyway, it would've been easier to just keep it closed, but I wanted to see how it might work as a closure. So I attached the waistband leaving it open at the placket area, inserted the elastic, and then stiched the ends closed. I still needed something to keep the waistband closed there, though. I considered using the top button from the polo that I'd had to cut off when cutting the shorts, but it seemed too small for that purpose. I tried a hook-and-eye, but it allowed the elastic to pull against the fabric too much and I didn't like it. So then I tried hook-and-loop, which worked fine.
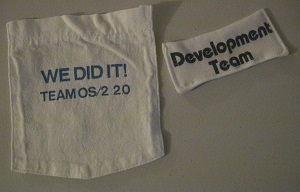 Meanwhile, I'd been thinking about the leftover pieces from the 2 original shirts.
I'd fully used the main graphic from both shirts, but each shirt
still had one additional small graphic that I hadn't done anything with
(pic at right).
I wanted to include them in this project, because I couldn't
picture them being relevant for any future project.
One of them was another pocket, which was easy enough to unpick and put on the
back side of the shorts.
The other was just a small piece, and I had to ponder on it for a while,
hoping to come up with something less random than just sticking it on
somewhere like a patch. Then it popped into my head that it
would work as a pocket flap for the original plain pocket from the polo.
So that's what I did.
Meanwhile, I'd been thinking about the leftover pieces from the 2 original shirts.
I'd fully used the main graphic from both shirts, but each shirt
still had one additional small graphic that I hadn't done anything with
(pic at right).
I wanted to include them in this project, because I couldn't
picture them being relevant for any future project.
One of them was another pocket, which was easy enough to unpick and put on the
back side of the shorts.
The other was just a small piece, and I had to ponder on it for a while,
hoping to come up with something less random than just sticking it on
somewhere like a patch. Then it popped into my head that it
would work as a pocket flap for the original plain pocket from the polo.
So that's what I did.
So here are the front and back views of the completed shorts:
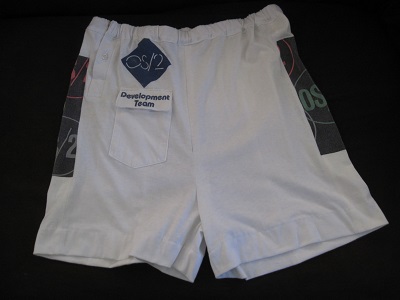
My original idea was that it would be fairly simple to make myself a pair of shorts out of one of my old polo shirts. This project was mainly an experiment to test that idea and presumably end up with something that I could wear around the house. I guess one could say the experiment worked, in that it did result in a fun pair of shorts for me. But, it was definitely not as simple as I had hypothesized; I wasn't expecting to have to piece in extra fabric. However, the original concept might still work for shorts that are at least a couple sizes smaller than the polo. So one of my polos might work for a child, or I might be able to make shorts for myself by thrifting a polo size 2X-3X or so.
I was also testing out how the button placket might work as part of the closure. My first observation is the placket does make it a little harder to cut the top because you need to pay attention to the buttons. Also, the extra layers make it a little harder to sew, and might make it a little harder if you wanted to make the casing for an elastic waistband by just folding over the top, rather than adding it as a separate piece of fabric. For those things, starting with a T-shirt instead of a polo would've worked better, except that T-shirts usually don't have a pocket or a graphic positioned in just the right spot.
As for using the placket as a closure, it's a maybe. Usually casual shorts like these would have an elastic waist, and for that the placket tends to get in the way as mentioned above. You'd normally only need a closure when the top of the pants are more fitted around the waist, and that kind of shaping tends to work better on woven fabrics rather than knits like the polo shirt. Also, assuming you place the crotch cutout where the armholes are, the placket-as-closure will end up somewhere on the side of the shorts rather than the typical and more readily accessible center front. But if you want to do it despite those minor issues, you can make it work.
I will admit I was being pretty lazy doing some of this, not always
doing the math, figuring things out as I went along, etc.
Sometimes this led to me doing more work instead of less.
An example was the waistband.
I'd cut a 3-inch strip from the bottom of the polo for the purpose,
and didn't measure how long it was before I started sewing it to the top
of the assembled shorts.
It was just a bit too short, like 2" or so. If I'd known, I could've
easily just eased it in to make it fit. As it was, I had to stop
sewing before I got too close to the end, cut and sew an extra piece
to make the band longer, press some bits to make them lay reasonably, and then
finish sewing the band on.
Not really surprising, so not exactly a "lesson learned" but more a
"lesson I should've paid more attention to."
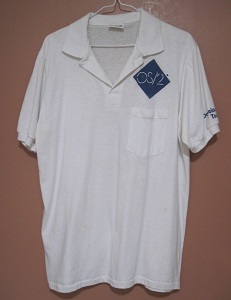
In case you're interested in the shirt(s). The polo shirt was from back in the days when I worked at IBM. It was a commemorative shirt for the OS/2 project, which today probably only means something if you were there. It was a basic white polo, with a plain pocket on the left front chest with a blue OS/2 logo printed above it. It also had the words "Development Team" printed on the left sleeve.
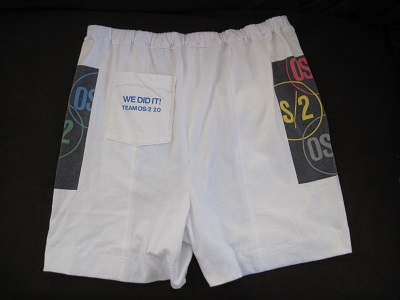
The T-shirt which I used for the additional fabric was
for version 2 of OS/2. It was also white, with
a large multicolor logo on the back,
and a chest pocket on the front that said
"We did it - Team OS/2 2.0".
(Didn't get a "before" pic, but you can see a pic after
I started cutting it in the story above.)
Return to Upcycling page
 Return home