
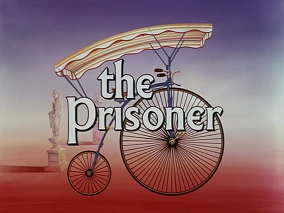

I don't recall specifically what made me want to do a cosplay from The Prisoner, the old TV series from 1967 by Patrick McGoohan. I was probably browsing on Etsy, looking for Star Trek pins or something like that, when I ran across "Vote for #6" pins, which likely prompted the idea. My first thought was black blazer with white trim, but I decided that was too iconic for #6 (pic at right), and I wanted to play a generic Village person, rather than any specific character. There's a lot of similarity in dress in the Village, but there's enough variation (as in the example pic below) that I knew I could come up with something else that would still be recognizeable.
My next idea was to use the multicolored umbrella as my key prop, because I already had one... or used to, anyway. I can't seem to find it any more, so I had to move on. The next idea was the multicolor cape, and the more I thought about it, the more I liked it. It's a very iconic costume piece in the show. I'd have to make it myself, but that shouldn't be all that hard, and I already had some fabric that would work--a plain poly/cotton blend in a few different colors.
I'd been rewatching the show after I found it streaming, which was a while before I even had any idea of cosplaying in it. Once I decided on cosplaying with the multicolor cape, I started googling images for more costume details. I observe that although there's a lot of capes in the show (especially the "Checkmate" episode), and there's a lot of color overlap among the various capes, it does seem that every cape is different. So I figure I have some freedom to choose my colors. I also observe that the capes tend to color-coordinate to some extent with the rest of the outfit (mainly the shirt, since the pants are usually neutral). So I really should have some idea of what colors I expect to be using for the cape before I go too far into getting the rest of the costume.
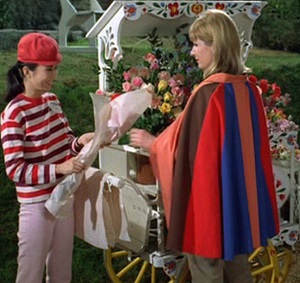 My memory told me I had a goodly amount of blue fabric, some red, and some coral,
all of which had a decent overlap with the on-screen capes (example at right).
I liked the idea of using blue as the "main" color.
I knew I'd need at least one additional color, but I figured that was enough
to go ahead and start assembling the rest of the costume:
My memory told me I had a goodly amount of blue fabric, some red, and some coral,
all of which had a decent overlap with the on-screen capes (example at right).
I liked the idea of using blue as the "main" color.
I knew I'd need at least one additional color, but I figured that was enough
to go ahead and start assembling the rest of the costume:
Of course the first step is gathering reference material. In addition to stills from the series, I also found some pictures from The Prop Gallery, and an online shop (Portmeirion Online) that sold similar capes. I think it was the latter that also included some measurements.

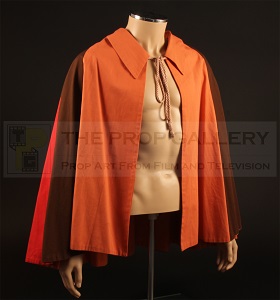
I saw in the pics that the cape had shaping at the shoulders, as well as a collar.
It wasn't going to be as easy to make as I had first thought.
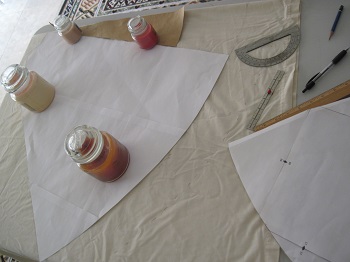
So I went looking for a pattern that might be helpful, and I found one called
the Fairy Tale Cape, from
This Blog Is Not For You.
After printing out the pattern and comparing it to the photos I had,
I figured it needed just a few simple mods:
it should be a bit longer (I added 3.5" to the bottom);
it should be a bit fuller (I added about a 15-degree wedge at the center back fold,
to add about 30 degrees around);
it needed a pointed collar
(the pattern website included instructions
on how to add a Peter Pan style collar, which was easy enough to adapt);
and it needed an open front with a tie neck
(I had to remove the overlap used for the button placket).
Pic below left shows pattern modification in process.
I felt a need to do a mock-up, so I made the cape mods directly on the muslin (actually an old sheet), and cut it out as though I were going to make the full cape. However, I cut the back piece of the cape in half down the center, and made just a half-cape for my mockup, because all I really needed to check was the length and the collar. The unused pieces from the other half would serve as my actual pattern pieces--that way I wouldn't have to unpick the mock-up. Assuming it was OK, of course, which it was.
So, patterning done, time to gather materials. At some point early on in the process I had tried to estimate how much fabric I'd need for each of the colors, and it came out to 1/2 yard for each of the secondary colors and 3 yards for the main color. The main color is so much more because it's not just the center front pieces, but also the center back, and the collar, and the full lining. I'd checked my stash to see what colors I had available, and in addition to the blue, red, and coral I had in mind to start with, I also had gold (not shiny, of course) and brown. The brown was the smallest piece, but it was more than 1/2 yard, so should be OK. There seemed to be enough of the blue, which was still my preference for the main color, so I played around with various combinations of the others and settled on coral, gold, and brown. But then I thought I should check it with the shirt I planned to use, since the shirt should at least kinda coordinate with the cape. I had been assuming that the blue of the cape would go with the navy of the shirt, but alas, it's a very dark navy and looks almost black, so it doesn't really work that way. So I decided to swap out the coral for the red, and have the red be the other front color, so it can echo the red in the shirt.
 That settled, on to the cutting.
I had to do the cape lining first, because it would be made with the
whole pattern pieces I'd made from the muslin.
My plan was that, after I was done using them to
cut the lining, I'd cut those pattern
pieces into the pie-shaped pattern pieces I'd need for the different colors
of the outside (remembering to add a seam allowance and notches for matching, of course).
That settled, on to the cutting.
I had to do the cape lining first, because it would be made with the
whole pattern pieces I'd made from the muslin.
My plan was that, after I was done using them to
cut the lining, I'd cut those pattern
pieces into the pie-shaped pattern pieces I'd need for the different colors
of the outside (remembering to add a seam allowance and notches for matching, of course).
But when I opened up the blue fabric, I saw that it had had things cut out of it before, and I didn't have as much fabric as I thought I had. It might work, though... no way to be sure except to go ahead and try, starting with the largest pieces, which conveniently were the lining. It took increasing amounts of futzing as I went thru the center fronts, center back, and collar (2 layers), but I was able to do it without having to buy more fabric or do any piecing together. (Pic at right)
Cutting the other colors went much more easily, as did the actual sewing of the body of the cape. First the blue lining at the side seams, then the collar, then attach the collar to the lining. Then assemble the multicolor pie shapes to make the outside layer, being thankful that I thought to include those notches for matching. Then stitch the lining to the outside along the sides and bottom, and turn rightside out.
At this point all that was left was the collar area, and this is
where things slowed down a bit.
Stitching the cape closed along the neckline was fussy, but
fairly straightforward.
The neck closure, however, required some pondering.
The cape ties with a rope-type cord at the neck that comes out from under
the collar. When I was first thinking about this project,
before I'd actually started on it, I figured the cord would go through
the collar stand--every other collar I can remember
ever making had a collar stand. However, the collar for this pattern
does not, and it doesn't appear the actual cape does either.
The collar seems to lay pretty nice and flat against the cape
(at least in the front), so I figured I'd have to add some kind of
casing/channel for the cord around the neckline.
But how to do that?
My first thought was either ribbon or bias tape, but
the cord is fairly thick (the one I bought for this project was
1/4") and I didn't have any tape or ribbon in the right color and size.
 Rather than go out and purchase some, I decided to
try making something suitable with scraps from the blue fabric,
which weren't going to be useful for much else, but would
ensure a perfect color match.
Bias tape would probably work best, considering the
neckline is curved.
I'd never made bias tape before, but hey, learning new things is fun, right?
(Pic at left/below. Yes, I have old tech, but it works.
I could see how having a rotary cutter would be really useful for
making bias tape, though. :-) )
Rather than go out and purchase some, I decided to
try making something suitable with scraps from the blue fabric,
which weren't going to be useful for much else, but would
ensure a perfect color match.
Bias tape would probably work best, considering the
neckline is curved.
I'd never made bias tape before, but hey, learning new things is fun, right?
(Pic at left/below. Yes, I have old tech, but it works.
I could see how having a rotary cutter would be really useful for
making bias tape, though. :-) )
I figured 3/4" tape would be fine for the 1/4" cord. Turned out that it worked, but it
was pretty tight.
First I pinned the bottom edge of the tape in place around the collar,
but when I tried to sew it on my machine, the pins just made it harder.
So I took them out and hand-basted instead, which helped immensely.
I did the top edge similarly, but I had concerns about trying to thread
the thick cord through the tight-ish channel, so
I put the cord in the channel before
sewing and used a zipper foot so I could get the machine stitching close enough.
Again, a bit tedious, but it worked.
Just some additional pressing around the edges and the cape was DONE!
I got to wear the costume at PalmCon in April 2025, and got these pics showing front and back:

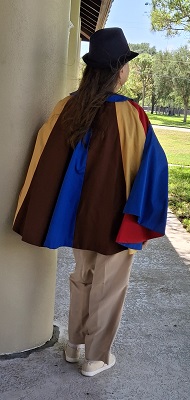
I am delighted with the result. And I even had several people
recognize and compliment me on the cosplay. My only negative feedback is that
I forgot to say "Be seeing you" to most of them :-)
Return to main Cosplay page
 Return home